All projects have there day and this week was "the day" for finishing a weather display project started during the pandemic! Back then I had planned to build out a web UI and run Apache to serve it up on the 7in Pi display but, I generally don't get excited about UI development (other than this blog) so it never went that far.
Enter the Python library, Textual, a UI development API for the terminal which helped me love UI development again!
Now terminal apps aren't everyone's thing and that's ok! On the other hand, I'm a huge fan of terminal apps. This somewhat steams from the nostalgic look that reminds me of the green screens of my childhood hacking. Also I find terminal apps to be focused and can really do a single thing better than all the html glitz depending on the apps function.
My custom temperature data.
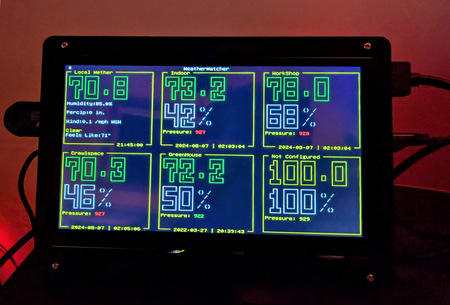
I have an array Raspberry pi zeros around my property that have been collecting temperature and humidity data for a few years, but never a convenient method for consuming that data. The Zeros are currently placed in various locations around the property, workshop, crawlspace, greenhouse and even attached to the back of my monitor. Thanks to the Zero's wifi feature they can take advantage of BME280 sensors to regularly save data using a simple python script that I call TempMon (No points for creativity I know).
This runs every 5 minutes via cron job and posts it's data to a Prometheus database running on a RPi4 using DietPi. Prometheus is a time series database that makes it so simple to post data using just a REST POST command. A side note worth pointing out; DietPi has an install package that makes installing and getting started with Prometheus super simple. One of the many reasons I love DietPi and run it on my RPi servers!
In addition to pulling data from my Prometheus datastore, I also retrieve my local current weather conditions from a free weather service called Visual Crossing. I've just scratched the surface of what this API can do, but it is super simple and I look forward to using it more. And, it has a free tier that's more than enough for a single device to use.
The Hardware
The display I am using is a Longrunner 7in touch screen that has headers on the back to attach an Pi 4. The PI4 is a bit of overkill for this setup but, this Pi has a broken SD card and I'm driving it off a usb stick, which means that instead of it just collecting dust in the electronics dust bin... it's now doing something useful. Getting it back in service is a win in my book!
The App
To jump to the code for WeatherWatcher, just hit the link!
Fair warning, I am still developing a deeper understanding of Python! I am experienced enough to write functional applications, but most likely lack the Py style and finesse that comes with deep experience. I also sometimes think in Java so that might explain any oddities. ;) With that said if you see some way I can do something better, I'm happy to hear about it!
Now as I mentioned earlier, Textual is the key dependency and core around designing my UI. I found Textual pretty easy to get started with thanks to the fantastic tutorial and examples they provide. My source code has a few files mainly broken down by function:
- weatherWatcher.py - is the main and contains the UI code, this includes a couple of custom TExtual components that are used to display the individual weather reading for each device and the weather api readings for Local conditions.
- DataRetriever.py - is responsible for the HTTP requests from both Prometheus and Visual Crossings API
- AsciiHelper.py - I little ascii library I created to render numbers into 5 row tall = ASCII numbers for display on the screen. It's a terminal app so font size is single row, but thats why we have ascii art!
- utils.py - just a few generic helper functions.
- config.py - config values for api calls etc. This is where you'd update the values to provide your own urls and api keys etc.
- grid_layout.tcss - defines the look of the Textual app with their very cool css based display system. Its css for the terminal which makes it easy to learn if you've messed with css a little.
One thing of note in the UI portion of the code is how I set up a few reusable components that are displayed in the grid, seen in the picture above. I created 2 components, CurrentConditions and LocalWeather which provides a nice example of how to setup custom components. I've included code for one of the components and added inline comments to explain key parts!
"""Current Conditions Widget displays the current Readings for a given monitoring device. u+00b0"""
class CurrentConditions(Static):
    device_name = "device"
    title = "Not Configured"
    pressure = 929

    # compose sets up all the various renderable objects mainly Labels in this case
    def compose(self) -> ComposeResult:
        self.temp_num = Label(AsciiHelper.getAsciiNumbers(100.0), classes="dataPoints")
        self.humid_num = Label(AsciiHelper.getAscii(f"{100.0:0.0f}%"), classes="dataPoints")

        self.temp_desc = Label("Current Temp")
        self.humid_desc = Label("Humidity")
        #Humidity
        pressure_field = Horizontal()
        self.pressure_desc = Label("Pressure: ")
        self.pressure_num = Label(f"{self.pressure:0.0f}", classes="dataPoints")

        yield self.temp_num
        yield self.humid_num
        # yield self.pressure_num

        yield pressure_field
        with pressure_field:
            yield self.pressure_desc
            yield self.pressure_num
    #sets various visual setting such as css when the component is displayed.
    def on_mount(self) -> None:
        self.humid_num.styles.color = "white"
        self.temp_num.styles.color = "yellow"
        self.styles.background = "dimgray"
        self.border_title = self.title
        # self.pressure_num.styles.text_style = "bold"

    #sets some configuration values that stay static but I want set when the app adds them to the main container.
    def setup(self, device: str = "device", title: str = "title") -> None:
        self.device_name = device
        self.title = title
        self.update()

    # updates the displayed data when new values are polled back from the datasource, its also pulling the data from the json results , nothing too exciting I guess.
    def set_data(self, data: dict) -> None:
        tempDisplay = AsciiHelper.getAsciiNumbers(f"{data['temperature']:0.1f}")
        self.temp_num.update(tempDisplay)
        self.temp_num.styles.color = utils.getTempColor(data['temperature'])
        self.humid_num.update(AsciiHelper.getAscii(f"{data['humidity']:0.0f}%"))
        self.humid_num.styles.color = "white"
        if self.pressure < data['pressure']:
            self.pressure_num.styles.color = "red"
        else:
            self.pressure_num.styles.color = "green"

        self.pressure = data['pressure']
        self.pressure_num.update(f"{self.pressure:0.0f}")
        self.border_subtitle = data['time'].split('.',1)[0].replace("T", " | ")
        self.update()
When building the interface the main app code creates a list of these components then iterates them to make them visual.
Update via Timer Event
To run a scheduled task to update the UI data, I used the Textual Timer function to trigger the DataRetriever that polls for updates. The code below calls the update_data() which in turn makes the calls to get and provide data to the visual components. I then call set_interval providing the interval in seconds (6 mins) and provide the update_data method as a callback. So every 6 minutes the app queries for new data and sets the Display components with results.
def on_mount(self) -> None:
    self.update_data()
    self.update_timer = self.set_interval(6*60, self.update_data)
Prometheus setup
I'm using a simple data structure for storing my BME280 data. Theres only so much data you can get from the sensor which really defines the structure for you. I just wanted to included it for reference incase it's helpful in reproducing the same setup I have. The literal field names are:
{"timestamp", "dataType", "device", "temperature", "humidity", "pressure"}
dataType allows for multiple types of IOT data, I tagged this data as "weather" just to make it short.
device the unique device name
The rest of the fields should be pretty clear!
Summary
Textual is an easy to use library for creating terminal interfaces that work great on a Raspberry Pi running without a GUI interface! With just a little effort in the tutorials and occasional querying of the docs you can get your own terminal app running on your RPi!